

You've got a design with gradients, shadows, and dozens of colors. Maybe it's a photograph you want on a T-shirt. Or an illustration with soft color transitions that can't be simplified into solid blocks. Regular spot-color screen printing won't cut it for this kind of work.
That's where full color screen printing comes in.
But here's where it gets confusing. When people talk about full-color printing, they're actually referring to two different techniques that work in completely different ways. One uses just four ink colors to create the illusion of thousands. The other uses multiple custom-mixed colors with tiny dots to build photorealistic images. Both can reproduce complex artwork, but they work best in different situations.
If you're a brand owner or designer trying to figure out whether your artwork is even possible with screen printing, or if you should be looking at other decoration methods instead, this breakdown will help you understand what's actually happening when ink hits fabric.
Let's walk through the shop floor and see how this stuff really works.
When someone says "full-color printing," they could mean a couple of different things. In the printing world, "full-color" typically refers to reproducing artwork that contains more colors than you'd want to print as individual spot colors.
Think about the difference between a logo with three solid colors versus a sunset photograph with hundreds of color variations. The logo works great as spot-color printing - you mix three inks, make three screens, and print them one after another. Clean, simple, predictable.
The sunset? That's a different challenge. You're not going to mix a hundred different ink colors and make a hundred screens. That's where full-color techniques become necessary.
There are two main approaches to full color screen printing:
CMYK process printing uses four standard colors (cyan, magenta, yellow, and black) printed with tiny halftone dots that your eye blends together to perceive full color. It's similar to how your inkjet printer at home works, but adapted for screen printing services.
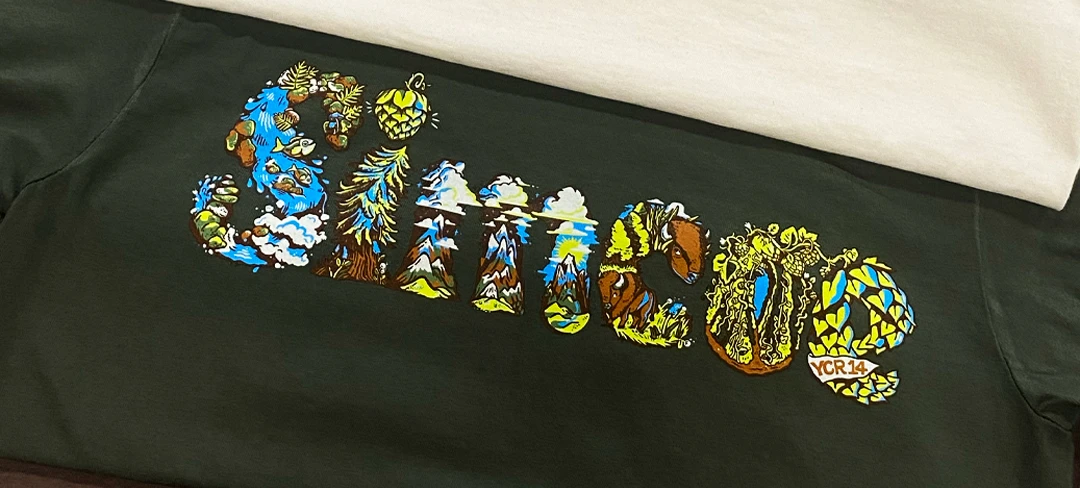
Simulated process printing takes a different route. Instead of limiting yourself to four standard colors, you use multiple custom-mixed colors - sometimes 7, 10, or even more - with halftone patterns to recreate photographs and complex artwork. Each color is specifically chosen to build the exact image you need.
Both techniques let you print designs that would be impossible with regular spot-color methods. But they work differently, cost differently, and produce different results depending on what you're printing and what fabric you're printing on.
Let's start with CMYK because most people have heard of it, even if they don't fully understand how it works.
CMYK stands for cyan, magenta, yellow, and black (the K stands for "key," which is the black plate that provides definition and depth). These four colors are the building blocks. By printing them in different combinations and densities, you can theoretically create thousands of colors.
Here's the thing that makes it work: halftones. Instead of printing solid blocks of color, you're printing tiny dots of each color. Where you need bright red, you overlap magenta and yellow dots. Where you need purple, you overlap cyan and magenta. Where you need subtle skin tones, you use very small dots of all four colors in precise patterns.
Your eye does the heavy lifting. When you look at a CMYK print from a normal viewing distance, your brain blends all those tiny dots together and perceives smooth color gradations and photorealistic detail.
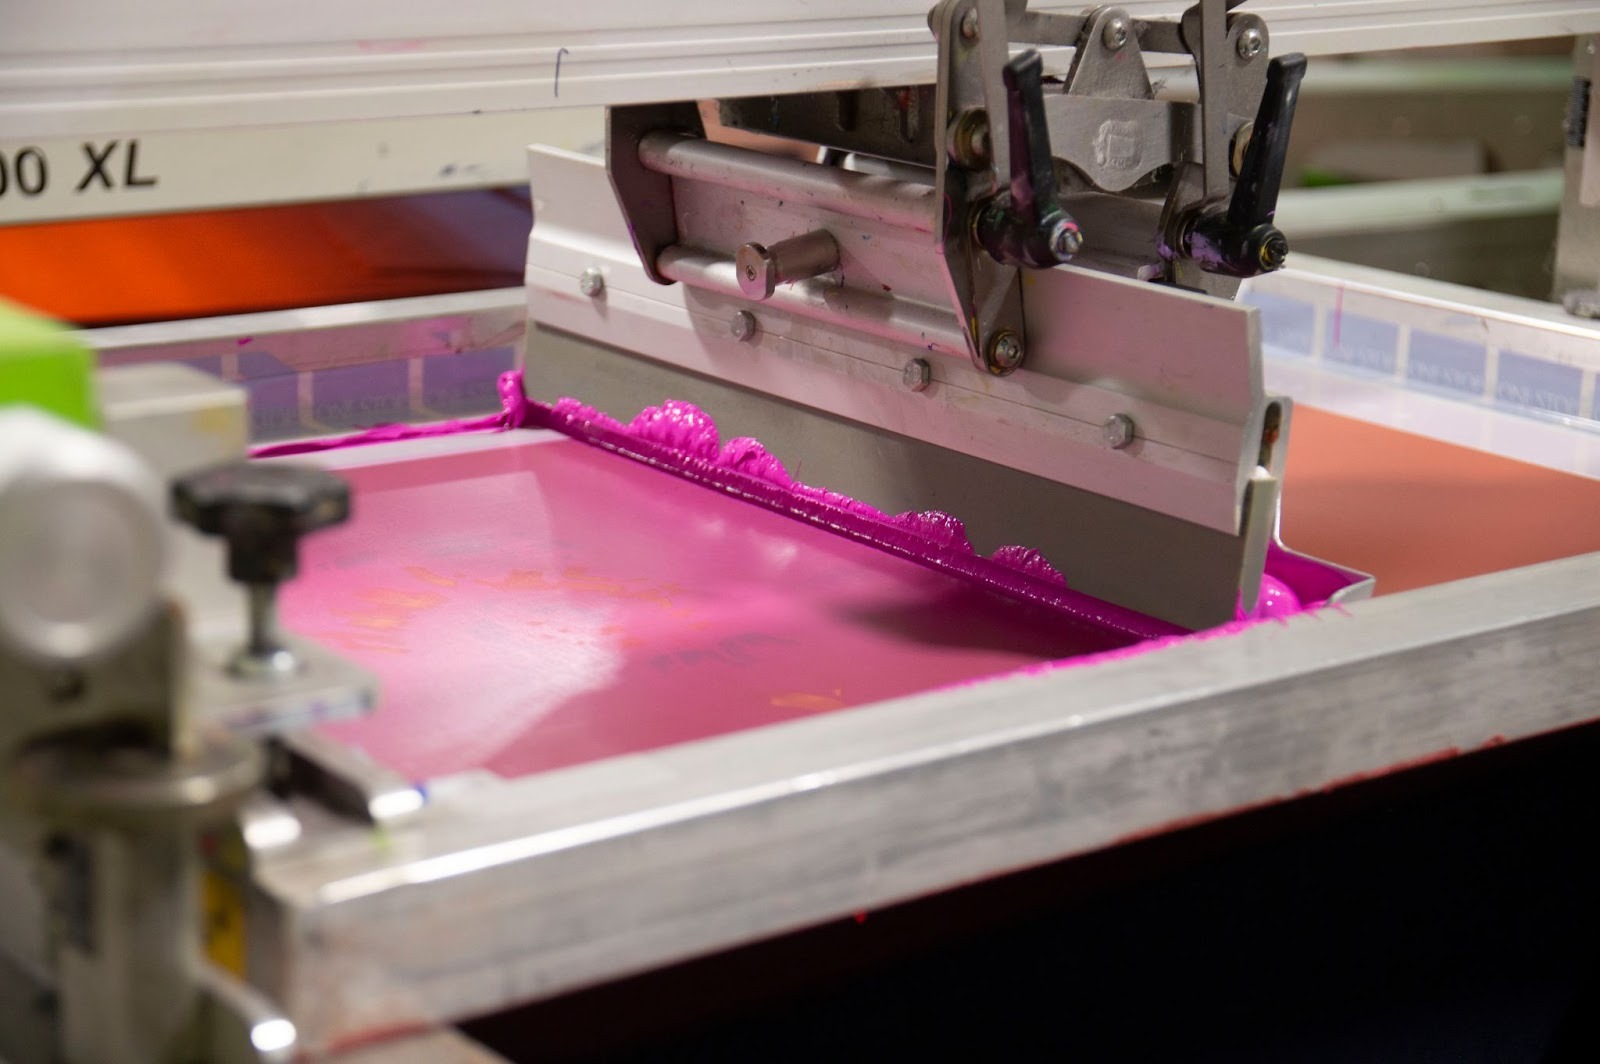
In screen printing, CMYK requires four screens - one for each color. The artwork gets separated into four layers by specialized software that converts your full-color image into patterns of halftone dots for each CMYK color.
The screens are printed in sequence: cyan first, then magenta, then yellow, then black. Each screen has thousands of tiny holes arranged in a dot pattern. Where the dots are larger and closer together, that color appears more intense. Where they're smaller and farther apart, that color appears lighter.
Registration is critical. If the screens don't line up perfectly, the colors won't blend correctly and you'll see blurry or misaligned images. That's why CMYK printing requires experienced press operators and well-maintained equipment.
CMYK process printing shines in specific situations:
The technique works best on light fabrics because the inks are translucent. They're designed to let light pass through them and bounce off the white fabric underneath, which is how the colors blend properly. On dark fabrics, CMYK struggles because there's no white base for light to reflect from, making colors appear muddy and dull.
Here's where CMYK runs into problems that catch a lot of people off guard.
First, it doesn't work well on dark garments without a white underbase, and even with an underbase, the results often disappoint. The translucent nature of CMYK inks means they need that white background to look vibrant.
Second, you're limited to the color range that cyan, magenta, yellow, and black can create. Bright oranges, vivid teals, and certain purples are tough to hit accurately. The color gamut (the range of colors that can be reproduced) is narrower than what you might expect.
Third, fine detail can be challenging. Those halftone dots have a minimum size, which means extremely fine lines or very small text might not reproduce clearly.
Fourth, the print has a specific texture. Because you're building color with overlapping dot patterns, there's a slightly grainy quality to CMYK prints when viewed up close. It's not always a problem, but it's different from the smooth look of spot-color printing.
Now let's talk about simulated process screen printing, which is what most professional screen printers use when someone asks for photorealistic printing or high-color-count artwork.
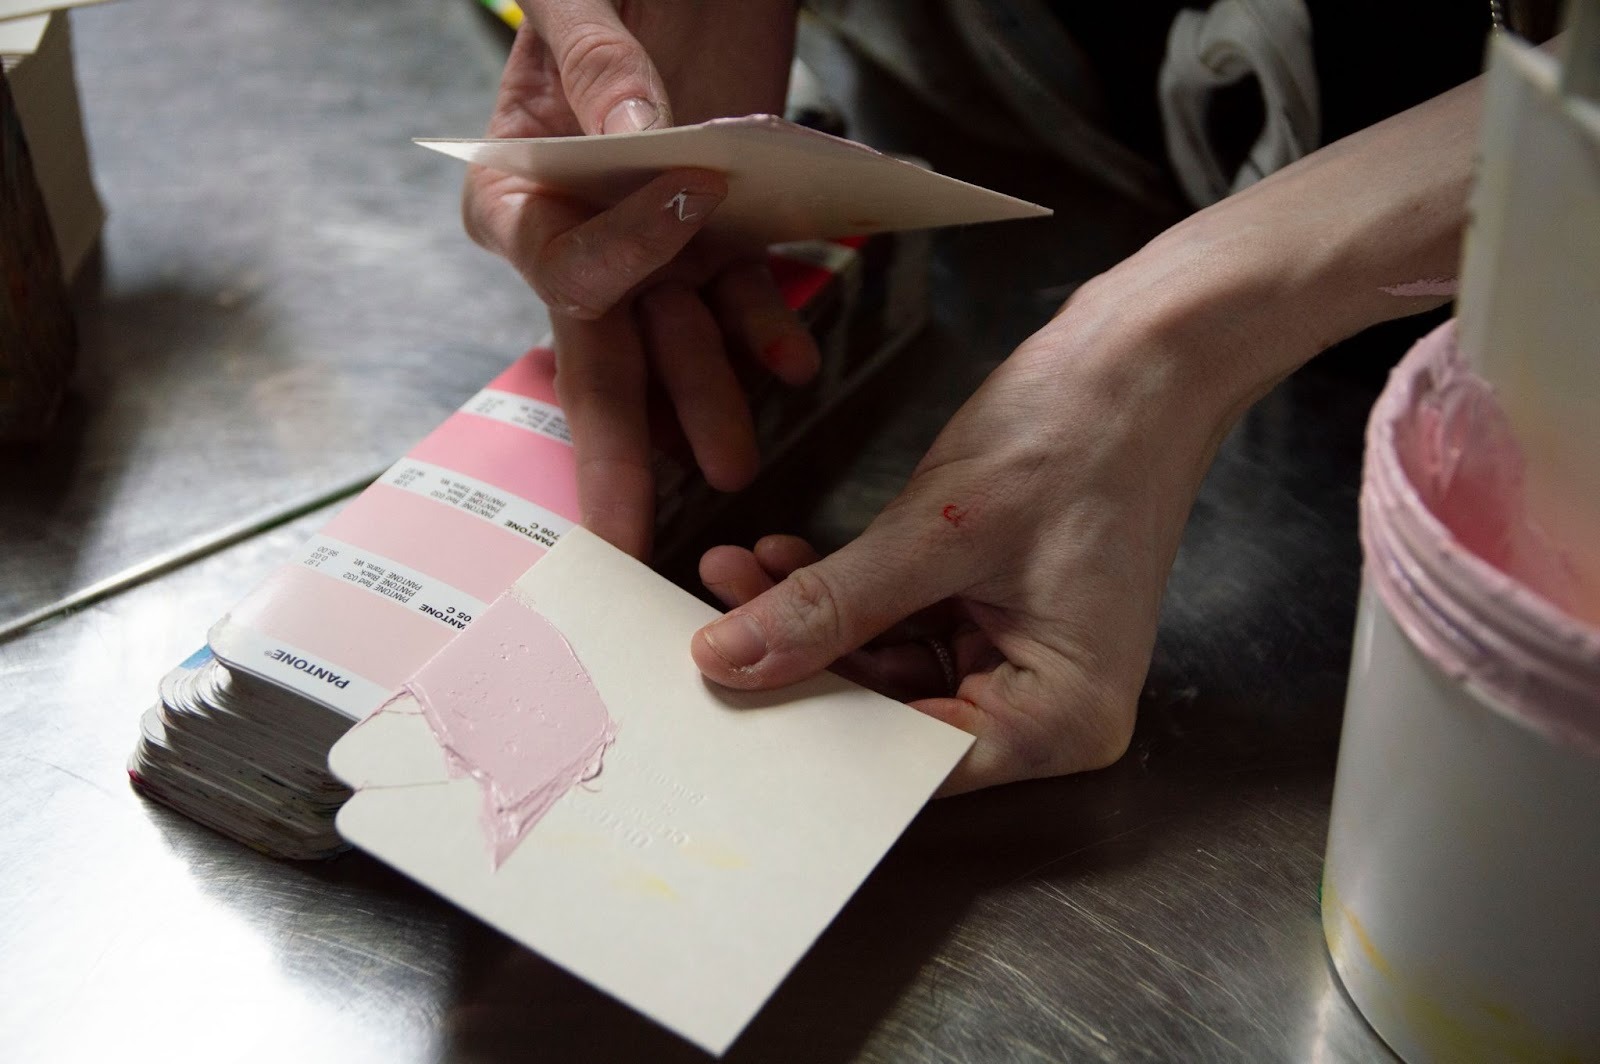
Instead of being locked into four standard colors, the simulated process uses custom-mixed inks chosen specifically for your design. If your artwork has a particular shade of teal that's crucial to the image, the printer mixes that exact teal. If there's a specific skin tone that needs to be perfect, that gets mixed too.
You might use 7 colors. You might use 12. The number depends on what's needed to accurately reproduce your artwork. Each of those colors is printed with halftone patterns - similar to CMYK - but because the colors are custom-mixed for your specific image, you get more accurate color reproduction and more vibrant results.
Think of a simulated process like painting with a custom palette. Before printing starts, a color separator (a specialist who prepares artwork for printing) analyzes your design and decides which specific colors will build the image most effectively.
They're not limited to cyan, magenta, yellow, and black. They might choose burgundy, coral, navy, forest green, and flesh tone if that's what the artwork needs. Then they create halftone patterns for each of those colors that, when overlapped, recreate your original image.
The screens get made for each custom color. Then the printing happens in sequence, with each color adding its layer to build toward the final image. The custom color selection means you get better color accuracy, more vibrant prints, and cleaner results than CMYK could deliver.
Simulated process printing excels in situations where CMYK falls short:
The technique works with plastisol ink or hybrid printing methods. Plastisol inks are opaque, so they sit on top of the fabric rather than being translucent like CMYK inks. This opacity is what allows the simulated process to work beautifully on dark garments.
For dark shirts, printers often use a white underbase - a layer of white ink printed first that creates a bright foundation for the colors on top. Then the custom colors get printed over that white base, maintaining their vibrancy even on black fabric.
The flexibility of the simulated process gives you several advantages over CMYK:
You get better color matching because you're not limited to what four standard inks can create. If your design has a specific orange that's critical to the image, the printer mixes that exact orange rather than trying to approximate it with magenta and yellow dots.
Vibrant results on any fabric color. Because the inks are opaque and you can use white underbases, the simulated process works on light garments, dark garments, and everything in between.
Smooth color transitions. The custom color selection means you can create gradients and shading that look more natural than CMYK dot patterns.
Brand color accuracy. If your artwork includes specific brand colors that need to match precisely, a simulated process can hit those targets where CMYK might drift.
So which technique should you use? It depends on your specific project.
Light garments (white, natural, light gray, pastels): Both CMYK and simulated process can work, but simulated process typically delivers more vibrant, accurate results.
Dark garments (black, navy, forest green, burgundy): Simulated process is the clear winner. CMYK struggles on dark fabrics even with white underbases.
Mixed garment colors: If you're printing the same design on both light and dark shirts, simulated process gives you consistency across all colors.
True photographs with subtle color variations: CMYK can work on light garments, but the simulated process often looks better.
Illustrations with distinct color areas: Simulated process handles these beautifully with custom color selection.
Artwork with specific brand colors: Simulated process ensures accurate color matching.
Gradients and shading: Both techniques can handle this, but a simulated process typically produces smoother results.
Here's a practical consideration that affects your decision.
Standard spot-color printing typically has minimums around 50 pieces for designs with fewer than 7 colors. When you get into full-color territory with 7 or more colors, minimums usually increase to 100 pieces because of the additional setup complexity and time required.
More screens mean more preparation, more press setup, and more production time. The minimums reflect those realities.
If you need extremely fine detail with crisp edges, consider that halftone-based printing has inherent limitations. Very small text or ultra-fine lines might not reproduce as crisply as you'd like.
For most photorealistic artwork and complex illustrations, the halftone method works great. But if your design has elements that absolutely must be razor-sharp, you might want to discuss with your printer whether certain elements should be printed as spot colors instead of halftones.
Let's look at real-world scenarios where full color screen printing makes sense.
Concert tees with photorealistic band member images or complex album artwork are classic applications for simulated process printing. These designs need to look vibrant on black shirts, maintain detail in shadowy areas, and reproduce skin tones accurately.
The custom color selection in the simulated process ensures that faces look natural, stage lighting effects come through clearly, and the overall image pops on dark garments.
If your brand aesthetic includes photographic elements - maybe lifestyle shots, product photography, or artistic portraits - a simulated process lets you bring those images onto apparel without compromising quality.
You maintain the detail, the color accuracy, and the professional look that your brand requires. The prints hold up to washing and wearing, which matters when customers are paying premium prices for your products.
Charity runs, festivals, and special events often feature complex designs with gradients, multiple colors, and detailed graphics. Full-color printing techniques let event organizers create memorable merchandise without simplifying their artwork.
Whether it's a festival poster design or a charity logo with intricate shading, simulated process reproduces the artwork faithfully on garments.
That worn, vintage concert tee aesthetic with soft colors and subtle fading? Simulated process combined with discharge screen printing techniques can recreate that look authentically.
The custom color mixing lets printers hit those exact vintage tones - the faded reds, the sun-bleached blues, and the weathered blacks - that give designs that genuine vintage character.
Full-color printing isn't the solution for every project. Let's talk about where it struggles.
100% cotton garments work best for most full-color printing, especially when using discharge techniques or hybrid printing methods.
Polyester and poly-blend fabrics present challenges. Discharge inks don't work at all on synthetic fabrics because there's no dye to remove. If you're printing on performance fabrics or poly blends, you're limited to plastisol-based simulated process or other techniques.
Tri-blend fabrics (cotton, polyester, and rayon blends) can work but may show slightly different results than 100% cotton due to how the different fibers accept ink.
Even with simulated processes, certain garment colors create challenges. Royal blue, forest green, and purple garments can be tricky because the underlying fabric color affects how the printed colors appear.
If color accuracy is critical to your brand, discuss garment color choices with your printer early in the process. They can advise which garment colors will give you the most accurate reproduction of your artwork.
Halftone printing - whether CMYK or simulated process - works by creating the illusion of continuous tone through patterns of dots. This means there's a minimum size for detail that will reproduce clearly.
Very thin lines (less than 1 point), extremely small text (under 6 points), and intricate patterns with fine detail might not print as crisply as you'd like. If your design includes these elements, consider whether they can be printed as spot colors instead of halftones.
Remember that full-color designs typically require 100-piece minimums (for 7+ colors) versus 50-piece minimums for simpler spot-color work. If you're launching a new brand or testing a design, the higher minimums might impact your initial inventory planning.
This isn't arbitrary - it reflects the additional setup time, color mixing, screen preparation, and production complexity involved in full-color printing.
Getting great results starts with proper artwork preparation. Here's what you need to know.
Your artwork should be provided at the actual print size you want on the garment. If you want a 12-inch-wide print, your file should be 12 inches wide at the resolution you're providing.
For photographic content or artwork with lots of detail, provide high-resolution files at the actual print size. Higher resolution gives better results for detailed reproduction.
Vector files (AI or EPS format) work great if your artwork is illustration-based. For photographic content, high-resolution Photoshop files (PSD) or TIFF files maintain quality better than compressed JPEGs.
If you're working in design software, understand that what you see on your screen won't perfectly match what prints on fabric. Screens display color using RGB (red, green, and blue light), but printing uses physical inks that work differently.
For the most accurate color representation, work in CMYK color mode if you're planning CMYK printing, or provide Pantone color references if you have specific colors that must match exactly for simulated process work.
That said, professional printers can work with RGB files and convert them appropriately. Just understand that exact screen-to-print color matching isn't possible due to the fundamental differences between light-based and ink-based color reproduction.
When submitting artwork for full-color printing, help your printer understand what's most important to you. If there are specific colors that must be accurate (brand colors, skin tones, product colors), call those out. If the overall mood and feel matter more than hitting specific color values, communicate that too.
Professional printers with experience in simulated process screen printing can make adjustments during the color separation process to emphasize what matters most for your design.
The color separation process - where your full-color artwork gets broken down into individual color layers for printing - is where the magic happens. This is typically handled by specialists who understand how to analyze artwork and determine which colors will build the image most effectively.
You'll usually receive a proof or mockup showing how the separated colors will look when printed. This is your chance to provide feedback about color accuracy, detail reproduction, and overall appearance before production begins.
Use this framework to determine which full-color technique makes sense for your specific needs.
What fabric color are you printing on?
What's your design style?
Do you have specific color requirements?
What's your order quantity?
How important is durability?
While screen printing is excellent for many applications, it's not always the right choice for every full-color design. Here are alternatives worth considering.
For very small quantities (15 pieces minimum), custom heat transfers using DTF technology can reproduce full-color artwork without screen printing setup.
DTF works great for testing designs before committing to larger screen-printed runs or for projects where you need just a few pieces with complex artwork. The feel and durability differ from screen printing, but it's a viable option for low quantities with high color counts.
If your order is under 50 pieces and your design has 7+ colors, heat transfers might be more cost-effective than screen printing. The setup costs for multiple screens get distributed across fewer units, making per-piece pricing higher for very small screen-printing runs.
For high color counts with low quantities, DTF transfers handle the complexity without the per-color setup overhead of screen printing.
Some projects benefit from using multiple decoration techniques on the same garment. You might screen print the main design using a simulated process for quality and durability, then add small heat transfer elements where screen printing isn't practical.
Or you could use screen printing for solid background elements and heat transfers for detailed photographic portions. Professional shops like Extreme Screen Prints can advise on combination approaches that deliver the results you need.
Full color screen printing opens up creative possibilities that simple spot-color printing can't match. Whether you're reproducing photographs, creating intricate illustrations, or building designs with complex color gradations, understanding the different techniques helps you make informed decisions.
Simulated process printing has become the industry standard for photorealistic work because it offers flexibility, vibrant results, and consistent quality across different garment colors. The custom color mixing approach delivers better results than CMYK for most apparel applications, especially on the dark-colored garments that many brands prefer.
The key is matching the printing method to your specific project requirements. Consider your garment colors, design complexity, order quantity, and quality expectations. Work with experienced printers who can guide you through the color separation process and ensure your artwork translates beautifully onto fabric.
When you understand what's possible with full-color printing and how the process actually works, you can design with confidence knowing your vision will come through in the final printed product.
Have a complex design you want to see in full color? Our photorealistic printing specialists can evaluate your artwork and recommend the best approach - get started with our quote builder or reach out to our team with questions about your specific project.
CMYK printing uses four standard colors (cyan, magenta, yellow, and black) with halftone dots to create full-color images, similar to how inkjet printers work. It works best on light-colored garments. Simulated process printing uses multiple custom-mixed colors - often 7 to 12 or more - specifically chosen for your design. Each color is printed with halftone patterns to build photorealistic images. Simulated process delivers more vibrant results, works on both light and dark garments, and offers better color accuracy because the inks are custom-mixed for your specific artwork rather than limited to four standard colors.
Yes, photographs can be printed on dark garments using simulated process screen printing. The technique typically involves printing a white underbase first to create a bright foundation, then printing custom-mixed colors over that white layer. This approach maintains the vibrancy and detail of photographic images even on black, navy, or other dark-colored shirts. CMYK process printing struggles on dark fabrics because the translucent inks need a light background to work properly, which is why simulated process is the preferred method for dark garments with photographic content.
The color count for photorealistic designs typically ranges from 7 to 12 colors when using simulated process printing. The exact number depends on your specific artwork - some designs might need fewer colors while others require more for accurate reproduction. A color separator analyzes your artwork and determines which specific colors will build the image most effectively. Designs with 7 or more colors usually have a minimum order quantity of 100 pieces due to the additional setup and preparation required. The custom color selection is what allows simulated process to reproduce photographs and complex artwork accurately.
Provide your artwork at the actual print size you want on the garment at high resolution. For photographic content, high-resolution Photoshop files (PSD) or TIFF files work best. Vector files (AI or EPS) are great for illustration-based artwork. If you only have JPEG files, make sure they're high resolution at print size and not compressed heavily. Printers can work with RGB files and convert them appropriately, though working in CMYK mode gives a closer approximation of printed colors. If your design includes specific brand colors that must match exactly, provide Pantone color references to help the printer mix accurate inks.
Full-color printing typically involves higher setup complexity because it requires more screens, custom color mixing, and specialized color separation work. Minimums are usually 100 pieces for designs with 7 or more colors compared to 50 pieces for simpler spot-color work. However, the per-piece pricing can be competitive once setup costs are distributed across your order quantity. For small quantities with very high color counts, direct-to-film heat transfers (15-piece minimums) might be more cost-effective. The quality and visual impact of full-color printing often justify the investment, especially for brands that need photorealistic reproduction or complex artwork that would be impossible with standard printing methods.
